Month: February 2014

agenda :: 2/22

today’s mini-lesson: create your own cubeecraft figures!

001acharacter001

  • i stumbled across this on the web this week and immediately thought of you guys – this might be a fun way to tinker around with the tools of graphics software like photoshop, illustrator, or gimp and create something that you can print and construct on your own. also, its clearly inspired by the minecraft type games that you are all so into.
  1. to get started, let’s take a look at the cubeecraft website. most of these designs were done by the artist chris beaumont (you can find him on deviantart here). all of these are free to download and print on your own, but i think the most fun part is that he provides a template so you can also design your own cubeecraft character.  here’s the link for the submission guidelines and templates
  2. download the cubeecraft template (psd or pdf format) to your desktop and open with photoshop. think about what kind of character you want to create. is it something from popular culture? a friend? a character you created on your own? browse the internet for images to inspire your creation and serve as a reference in your own design.
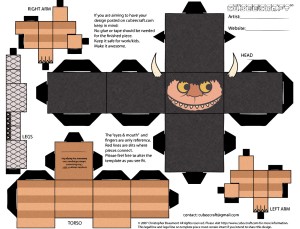
  3. create a new layer underneath the template and start designing your character with whatever tools you wish. using simple shapes and color schemes seems to look the best, but also pay attention to what details you can add to your design to make your character recognizable. if you get confused about which part of the template is which, compare with other examples found on the cubeecraft website to make sure everything ends up in the right place. here’s my finished “where the wild things are” template:
    blank_template
  4. once you’re satisfied, you’re ready to print, cut out, and fold! most of these are designed to be printed on standard letter sized paper, but i wanted mine bigger so i went to our computer lab in the art building and printed it out on larger format paper. i’d be happy to do this for you this week if you’d like, just send your design to my email bmolson1@illinois.edu!

agenda :: 2/15

today: digital collage/play day

22_tumblrlrh98ojthc1r1bhvio1500

today for my mini lesson, i’d like to show you some work by artists who use digital imaging software like photoshop to reinvent the old idea of collage. collage has always been about experimenting, mixing and matching, and juxtaposing seemingly unrelated images to come up with a new work. with so many images at your fingertips online, it seems like a no-brainer for today’s artists to use this wealth of media for their own work. here’s a few examples of what people are doing with digital collage today. what tools within photoshop do you think each artist is using? what are the basic elements that each picture is made up of?

ok, so your assignment today (if you choose to accept it) is pretty open ended. if you’d like, surf the web for interesting images, tinker around in photoshop, and create your own digital collages. its up to you how simple or complex they should be, and what tools you will use within photoshop.  feel free to experiment on your own with the various tools in photoshop like layers, masking, filters, etc. if digital collage just isn’t your thing, that’s fine, you’re more than welcome to direct yourself towards something else you’d prefer to work on. here’s some helpful tutorials i’ve run across in the past week that i thought you all might be interested in:

  • 35 collage photoshop tutorials :: even if you don’t follow these to the letter, it can be helpful to read through and learn some tips and tricks
  • character design tutorials :: it seems like a lot of you are interested in designing and drawing your own characters for various reasons – this is a good list of projects you might try out to hone your skills in illustrator or photoshop
  • ctrlpaint.com :: since a lot of you are interested in digital painting with your tablets, this website has a lot of great info for beginners or more advanced users.
  • design.tutsplus.com :: this website has a lot of high quality tutorials on a lot of subjects including design & illustration, web design/coding, music/audio, 3d & motion graphics. take a look here if you’re looking for some help navigating a specific subject
  • you suck at photoshop :: this youtube channel is devoted to teaching you how to be better at photoshop. well, kind of. it is sorta entertaining and you might learn a few tricks along the way.

ok, now go off on your own and see what you can do. give me a holler if you’ve got any questions or problems i can help out with!

agenda :: 2/8

Today’s mini-lesson :: Vector Portraits in Adobe Illustrator

  • A little about vectors: Today, we’re going to try out some basic tools in Adobe Illustrator. This program is a little different than Photoshop, and works by using “vectors” (lines, points, shapes, polygons) to create a drawing or image. It’s not too hard once you get the hang of it, so let’s me show you a fairly simple project you can try out on your own to learn the program a bit more.
  1. First, find a picture that you would like to use as your reference. As always, you can use your own photographs for this process, but I just picked Bieber’s mugshot for demo purposes:
    justin-bieber-mugshot
  2. Open this file in Photoshop. Convert the image from “background” to layer like we covered last week so we can use it (right click on the layer in the Layers Panel). Go to the Image menu, and under mode, change to Grayscale.  Feel free to change the Brightness and Contrast under Adjustments to create stronger areas of light and dark.
  3. Next, use the Pen tool to trace around the head. When you come back around to the point you started at, close the path by clicking onto it again. Right click and choose “Make Selection”.
  4. While the selection is glimmering, click the Layer Mask button in the Layers panel. It’s at the bottom and looks like a circle inside a rectangle. This should clip out the background and leave only the head.
    mask
  5. Click the adjustment layer icon (circle next to the Layer Mask) and choose Threshold. Drag the slider until the images darkest features just start to appear. Save this image to your desktop as a .jpg file. Drag the slider further right so that the image has more dark areas and save this image as well. Now we’re done with Photoshop, so feel free to close out.
    biebs1 biebs2
  6. Open both of these files with Illustrator. Take the darkest layer and copy it, then past it into the other document. Press command+B to make sure it is pasted directly behind the other image and will line up. Add a rectangular shape in a color of your choice and move it to the back (drag in the Layers panel, or press command+]. You may have to adjust the image settings to make it color, which you can do under by going to Edit >> Edit Colors and selecting RGB or CMYK
  7. Make the back image invisible and select the top image, and find the Image Trace button at the top. Click the Image Trace button and open the tracing options by clicking the Image Trace Panel icon between the Preset and View menus. Check the Preview box, and adjust the Threshold, Paths, Corners, and Noise until you get a result you like. When you’re happy, click Expand from the Live Trace panel on the top. Select the white arrow tool (Direct Selection) and click any white area to select it. We want to only keep the black shapes, so press delete.
    biebs-l1t
  8. Make this layer invisible and repeat step 7 with the other layer. Make both layers visible again, and with the bottom layer selected, change the color to a lighter gray shade.
    beibs-l2t
  9. Use the pen tool to trace a shape around the face. Make this shape white and move it all the way to the back of the layers until it moves behind.
    biebs-whiteface
  10. Use the pen tool to delete points that might be too jagged or rough looking, or to add lines for definition. Experiment with the Line Width tool to add line variation. Adjust paths by using the Direct Selection arrow and pulling on handles or moving points. Refine the illustration however you like!
    biebs-final
  11. Save a copy by going to File and selecting Save for Web and Devices. You’re done!

AGENDA :: 2/1

MINI-LESSON: Making Mini Planets in Photoshop

windfarm

Today, I’m going to show you a Photoshop trick that is pretty easy but really fun. I found myself hooked making these this week in Photoshop and think you’ll have a good time with your own today. In short, we’re going to learn how to turn any landscape image into a surreal looking, exaggerated planet by using the “Polar Coordinates” filter in Photoshop. From there you can alter just about any way you want. Just follow these steps and see what you can come up with!

  1. First, locate an image of a landscape that you like. Maybe its a picture from your own backyard, the skyline of your favorite city, a place you want to go someday. Whatever you can find! Panoramas are the best for this project, but just about any photo will work as long is it is wider than it is tall. The best kinds seem to have an even horizon line and a few items that stick out over the top of the horizon. Here’s the one I picked for this demo:
    Smoky_Hills_Wind_Farm
  2. Open this photo in Photoshop, and convert the layer from a “Background” layer to a standard one by right-clicking on the layer in the Layers Panel, and selecting “Layer from Background”.
  3. Now, we want to make sure the photo’s edges match up, so that if you wrapped it around on itself it would create a fairly seamless edge. To do this, select a vertical slice from the right side of the image and copy it to the clipboard (command+c). Paste this onto a new layer (command+v).
  4. With the Rectangular Marquee Tool selected, right-click and select “Free Transform”. Right click again, and select “Flip Horizontal”. Drag this layer over to the opposite side of the photo.
    4
  5. Use the eraser tool (set to a soft brush and light opacity/pressure) to blend out the edge that is visible as seamlessly as possible. Make sure when you’re done the left edge matches the right edge of the photo. Merge your two layers into one (command+e).
    5
  6. Use “Free Transform” again to flip the whole image vertically. It should look upside down when you’re done to get the right result.
  7. Next, go to the Filters menu and find the Distort tab. Select “Polar Coordinates” from the list and approve the pop-up menu.
  8. Almost done. We still have to squeeze this back into proportion and crop it. Right-click to use Free Transform again, and drag the image inward horizontally until it looks right to you. Feel free to rotate and reposition key elements.
    10
  9. Finally, let’s cut out the unused space. Use the Rectagular Marquee tool again to select what area you want to keep, go into the Image menu and select “Crop”.
  10. You’re done! Save your file or keep playing with other tools to alter it!

Here’s some more that I did throughout the week. Like I said, I’m hooked.

This slideshow requires JavaScript.

Introduction to GIMP :: An open source (and free) alternative to Photoshop. This software is available for Mac or PC and is free to download – it does pretty much anything you can  do in Photoshop. Check out more here if you’d like: gimp.org